How to use JavaScript and Node packages in a Blazor app

As a front-end browser technology based on .NET, Blazor is one of the top contenders for an quasi-alternative to ubiquitous JavaScript. At Airbadge (a virtual office for remote collaboration and team building), we are excited about the prospect of using C# on the client side, not to mention the potential of native compiled code for improved performance. Blazor is currently a hot topic at Microsoft, which affords it a good level of attention and steady progress.
Despite this, JavaScript will remain firmly entrenched for many years to come, due to its popularity among developers and an impressive collection of ready-made libraries.
Fortunately, Blazor offers ways for .NET and JavaScript to communicate with one another, known as JavaScript Interoperability (JS Interop), and this capability has received an important update in .NET 5.0
In this article, we are going to cover how to call JavaScript from Blazor using the new JS isolation mechanism found in .NET 5.0. We are then going to describe an easy and elegant way to use Node packages in a Blazor app using Snowpack or Skypack.
Calling JavaScript functions from Blazor using JS isolation
.NET 5.0 introduces a new set of classes in the JS Interop namespace, that provide improvements on how Blazor integrates with JavaScript. Collectively, these classes form a new feature called JS isolation.
Instead of having to declare your JavaScript functions globally for your entire app, you can now separate them and tie them to the specific Razor components that will be using them. Together with CSS Isolation, this makes your components truly portable and self-contained.
This is particularly useful when distributing components in a Razor class library, since the users of your lib will no longer need to reference your JavaScript in a script tag, or even have any awareness of your inner implementation details.
-
Launch Visual Studio and create a new Blazor app (or Razor class library). Make sure to use the latest version of VS and .NET. As of this article this is .NET 5.0
-
Create a new Razor component and call the file
Component1.razor. -
In the
wwwrootfolder of your project, create a new subfolder calledjs. This is the public-facing folder where all your JavaScript assets are going. -
Under the
jsfolder, create acomponent1.jsfile. This will be the companion JavaScript file toComponent1.razor. Technically you could name the file anything, but for the sake of maintenance it’s best to keep it consistent with the name of your component. Open thecomponent1.jsfile and copy the following:export function helloWorld() { prompt('Hello World!'); }This is a simple function that opens a prompt and says Hello World. The export keyword is important and denotes that we are using the standard JavaScript module system, known as ECMAScript (ES). Essentially, ES uses the import statement to bring in outside code to be used in our module (
component1.jsis known as a module), and the export statement to publish our code to the outside (for instance to Blazor). We will see in the second part of this article how to import code from Node libraries. -
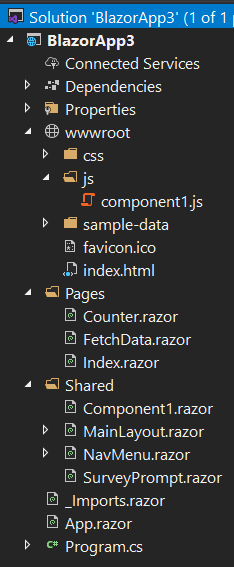
At this point, your folder structure should look something like this:
-
Open
Component1.razorand replace the content with:@inject IJSRuntime jsRuntime <h3>Component1</h3> @code { protected override async Task OnAfterRenderAsync(bool firstRender) { if (firstRender) { await using var jsModule = await jsRuntime.InvokeAsync<IJSObjectReference>("import", "./js/ component1.js"); await jsModule.InvokeVoidAsync("helloWorld"); } } }The OnAfterRenderAsync lifecycle method is a good place to make JS Interop calls, since the DOM is fully loaded at this point. But you can make JS calls at any other time if you don’t need the DOM.
In keeping with the ES module system, we are performing a JavaScript import from Blazor using InvokeAsync. This returns the IJSObjectReference of the imported module. This object must be properly disposed of since it implements IAsyncDisposable, hence the await using statement.
At this point, it’s important to understand the IJSObjectReference interface returned by the import statement. This is one of the new classes .NET 5.0 has introduced, and it represents a reference to a JavaScript object returned by a JavaScript function. Unlike a regular return value, it can only be used to invoke functions contained within the returned object. There are 2 more IJSObjectReference-type classes if your Blazor app is client-side only and you want to take advantage of some optimizations; you can use IJSInProcessObjectReference or even IJSUnmarshalledObjectReference for extreme optimization cases. Personally, I only develop client-side Blazor so I use IJSInProcessObjectReference. Server-side Blazor must stick to IJSObjectReference.
The second line invokes a JavaScript function contained within the imported
component1.jsmodule, in this case helloWorld.The alternate example below covers a slightly more complex use case. Sometimes, your JavaScript activity spans multiple C# methods. Rather than creating several IJSObjectReference objects all pointing to the same module, save it as a class field and reuse it as needed:
 @implements IAsyncDisposable

 @inject IJSRuntime jsRuntime

 <h3>Component1</h3>

 @code
 {
     private Lazy<Task<IJSObjectReference>> jsModuleTask;

     protected override void OnInitialized()
     {
         jsModuleTask = new(() => jsRuntime.InvokeAsync<IJSObjectReference>("import", "./js/component1.js").AsTask());
     }

     protected override async Task OnAfterRenderAsync(bool firstRender)
     {
         if (firstRender)
         {
             var jsModule = await jsModuleTask.Value;
             await jsModule.InvokeVoidAsync("helloWorld");
         }
     }

     public async ValueTask DisposeAsync()
     {
         if (jsModuleTask.IsValueCreated)
         {
             var jsModule = await jsModuleTask.Value;
             await jsModule.DisposeAsync();
         }
     }
 }
The OnInitialized lifecycle method prepares the JavaScript import statement. “Prepares” is the keyword here, since we aren’t executing the statement right away, instead saving it for later in a lazily initialized object. If we tried executing this asynchronous statement in an OnInitializedAsync method, by design Blazor would call our OnAfterRender method twice. The first time with a null value for the imported module, and the second time with the actual module, but a firstRender value of false, preventing us from using the module on the first render (for example to call a JavaScript initialization function).
The OnAfterRenderAsync method is where we actually run the import statement. This is triggered the first time we access the Value field of our lazy object. This call is asynchronous, but perfectly safe to perform at this stage. We can now invoke the JavaScript functions contained within the imported module.
Lastly, the disposal of IJSObjectReference must be implemented in a DisposeAsync method as shown, and your component must implement IAsyncDisposable.
-
You can now open the Razor file of your choice (for example
Index.razor), and add your new component in the markup:@page "/" <Component1 /> -
Run your app and notice the JavaScript prompt.
Component1 can now be reused anywhere without the extra step of referencing the component1.js file or even being aware of JavaScript behind the scene.
Even better, you can distribute Component1 as part of a Razor class library. Implementation is the same, except that the JavaScript import statement must reference your module under the ./_content/[lib assembly name]/js/component1.js path. Although the file still resides in the wwwroot folder of your Razor class library project, once merged with a Blazor app, the library’s wwwroot folder gets moved under this special path to avoid conflicts.
For the ultimate use of JS isolation, you can replicate the same approach in a custom dependency injection service, for example when writing a JavaScript library wrapper for Blazor. Lazy load the import statement in your service constructor, and use the imported module within the various methods provided by your service. At no point will the users of your wrapper ever need to bother with JavaScript, a huge productivity benefit.
Using Node packages in Blazor with Snowpack
Node.js is a JavaScript runtime and toolkit for running JavaScript apps outside of a browser. NPM is the Node Package Manager, and comes bundled with Node. NPM has become a standard for downloading and updating third-party JavaScript libraries. Although we are running JavaScript in the browser and aren’t interested in using Node, we need NPM in order to take advantage of some of the packages that don’t have a .NET equivalent.
A downside to Node packages, is that they are not compatible with browsers out of the box. Node uses its own module system called CommonJS, while browsers support ECMAScript (ES). This has forced front-end web developers to use build tools called bundlers in order to convert JavaScript from CommonJS to ES.
Snowpack is a lightweight, easy-to-use JavaScript build tool designed for front-end developers. I have found it to work particularly well in a Blazor development environment. And if you don’t want a build tool at all, jump straight to the next section to learn about Skypack, a CDN that is ES compatible out of the box.
-
As a starting point, use the same Blazor project you created earlier in the article.
-
Close VS, download Node from the official website, and install it on your system. This will also install NPM. Re-open the VS project.
-
In the root folder of your project, create a new folder called
JS, and under it a subfolder calledsrc. Move your JavaScript assets such ascomponent1.jsfromwwwroot/jsover toJS/src.JS/srcwill now be the JavaScript source folder, andwwwroot/jswill become the destination folder for the transpiled modules. From now on, you should work exclusively in theJS/srcfolder and let Snowpack generate thewwwroot/jsfolder at build time. -
Open a terminal within VS (View > Terminal) and execute the following commands:
 $ cd JS
 $ npm init -y
This will create the default
package.jsonNPM configuration file in theJSfolder. -
Now let’s install Snowpack using NPM.
$ npm i --save-dev snowpackThis will download and install Snowpack and its dependencies under the hidden
node_modulesfolder. The –save-dev flag means that the packages will be installed as development tools, and will not be included in your final build. -
I recommend installing the optional Optimize plugin for Snowpack, in order to minify your final published JavaScript during the build step (reduce its size).
$ npm i --save-dev @snowpack/plugin-optimize -
Finally, since the reason you’re doing all this is to use JS libraries, you will need to install them at this stage. For example, let’s install lodash, a data manipulation library.
$ npm i --save lodashNotice that this time we have used the –save flag, meaning the package will be included in your final code to be run in the browser.
-
Open the
package.jsonNPM config file. We’re going to simplify it a bit by removing unused options, and add a build script for Snowpack. When building your Blazor app, VS will trigger the build script, which will run Snowpack, which in turn will transpile the JavaScript from CommonJS to ES! Your config file should now look something like this (version numbers may differ):{ "scripts": { "snowpack-build": "snowpack build" }, "devDependencies": { "snowpack": "^2.18.5", "@snowpack/plugin-optimize": "^0.2.10" }, "dependencies": { "lodash": "^4.17.20" } } -
Let’s turn our attention to the Snowpack config. Under the
JSfolder, Create a file calledsnowpack.config.jsand paste the following:module.exports = { plugins: [ ['@snowpack/plugin-optimize'] ], buildOptions: { out: '../wwwroot/js/', clean: true }, mount: { 'src': '/' }, };This simple configuration loads the Optimize plugin, specifies the destination folder (out), and overwrites it as needed (clean). It also maps the source
JS/srcfolder to thewwwroot/jsdestination folder. -
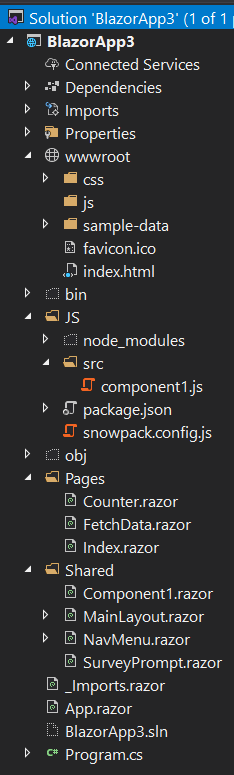
Your project’s folder structure should look like this:
-
The final stage of building our JavaScript toolchain is to integrate it into the VS build step. Double-click your project in the Solution Explorer in order to bring up your
.csprojfile. Add the following section:<Target Name="PostBuild" AfterTargets="PostBuildEvent"> <Exec Condition="$(Configuration) == 'Debug'" Command="cd JS && npm run snowpack-build" /> <Exec Condition="$(Configuration) == 'Release'" Command="cd JS && npm run snowpack-build" /> </Target>This will instruct VS to run your snowpack-build NPM script when building your project in Debug and Release mode.
-
Now that we have installed the tooling, let’s finally write some JavaScript. Open the
component1.jsfile under theJSfolder, and modify it to look like this:import _ from 'lodash'; export function helloWorld() { prompt(_.VERSION); }The import statement uses the ES module system to bring the lodash library into our code. Lodash is often assigned to the underscore variable by convention, but you could name that variable anything you want. As we’ve seen before, the export statement makes the helloWorld function available to Blazor.
There is an alternative form of the import statement. The example above shows how to import the default module from lodash. It includes everything in this large library. You can also import one or more named modules using the following syntax:
import { sortBy, orderBy } from 'lodash';This is the recommended approach when working with large libraries, since it reduces the final file size to only the subset of modules you are using.
-
Now you can run the app and see that the lodash version is being displayed in the prompt. That’s it! Enjoy using Node libraries in your Blazor projects!
The lazy man option: using Node packages in Blazor with Skypack
Skypack is a Content Delivery Network (CDN) that delivers NPM packages in ES format, so that it can be imported into your code directly, requiring no build step at all. This is a quick and easy option if you do not mind depending on a CDN, or if you want to test out a library without installing it first.
For this option you do not need to install Node, NPM, Snowpack or modify any configuration as detailed in the previous section. This will work in your stock Blazor app with JS Isolation. Open your component1.js file under wwwroot/js and replace the content with:
import _ from 'https://cdn.skypack.dev/lodash';

export function helloWorld()
{
    prompt(_.VERSION);
}
Run your app and notice that it shows the lodash version in a prompt. The only thing simpler than this, is if your app could write itself.